Photo Restoration: Reviving Memories & Creating Lasting Prints
How Digital Photo Restoration Works
Old photographs carry more than images. They hold family history, personal milestones, and moments that may not exist anywhere else. Over time, those photographs can fade, tear, stain, or become damaged by moisture, handling, or age.
Digital photo restoration helps preserve those memories by creating a carefully repaired digital version of the original image. Here’s how the process typically works.
1. Assessing the Photo
The first step is to evaluate the condition of the photograph. We look for fading, discoloration, tears, creases, water damage, stains, missing areas, and other signs of wear. This helps us determine what kind of restoration work is needed and how much detail can realistically be recovered.
2. Scanning and Digitizing
If the original is a printed photograph, we begin by creating a high-quality digital scan. A strong scan is essential because it gives us the best possible starting point for the restoration work. The better the digital file, the more carefully and accurately the image can be restored.
3. Cleaning Up Damage
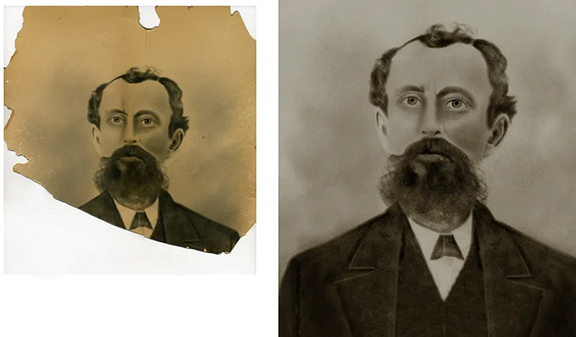
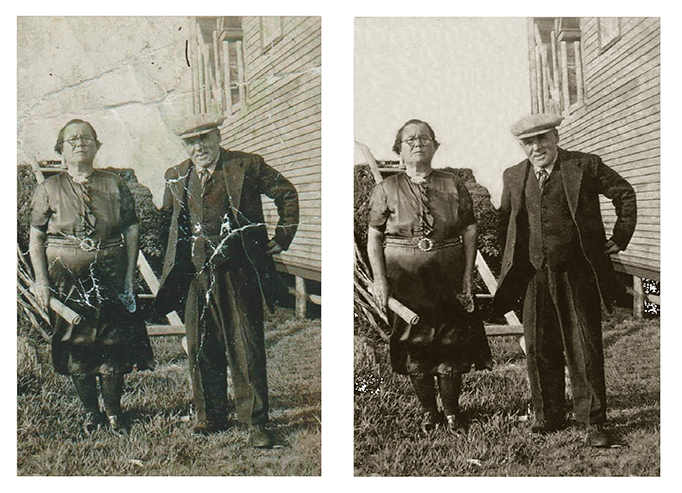
Once the image is digitized, we begin the cleanup process using professional editing tools. This may include reducing scratches, softening creases, removing spots, repairing stains, and addressing other visible damage while preserving the character of the original photograph.
4. Restoring Color and Contrast
Many older photographs become faded, yellowed, or washed out over time. During restoration, we adjust color, contrast, brightness, and tonal balance to bring the image closer to its original appearance. The goal is not to make the photo look artificial, but to restore clarity and depth.
5. Repairing Tears and Missing Areas
Photos with tears, cracks, or missing sections often require more detailed work. In these cases, we carefully rebuild damaged areas using surrounding parts of the image as a guide. This step requires patience and a light touch so the final result looks natural.
6. Refining the Details
After the larger repairs are complete, we focus on the finer details. This may include sharpening soft areas, improving facial features, balancing shadows and highlights, and making sure the restored image feels cohesive. The goal is always to honor the original photograph, not over-process it.
7. Reviewing the Restored Image
Once the restoration is complete, the final image is reviewed for quality and accuracy. A successful restoration should feel like the memory has been gently brought back into focus.
8. Preserving the File for the Future
After restoration, you receive a digital file that can be stored, shared, and printed. Having a digital version also helps protect the image from further handling and gives you a backup for future generations.
9. Printing and Displaying
Once the restoration is finished, the image can be printed on photo paper, art paper, or canvas, depending on the look and use you prefer. A restored photograph can be framed, gifted, added to a family archive, or displayed as part of your home’s story.
Preserving the Stories Behind the Photographs
Digital photo restoration is about more than repairing old images. It helps preserve family history, revive meaningful memories, and keep personal stories connected to the present.
Whether it’s a formal portrait, a wedding photograph, a military image, or a candid family snapshot, each photograph has something worth saving. If you have old photos tucked away in boxes or albums, restoration can help bring those memories back into view.